
When I started I scoured the internet looking for advice on
shooting low light sporting events and found information that was all over the
place. Some of it was great and right
on. Some of it, in my humble opinion,
was just flat out wrong.
I am not the best photographer, nor am I the most
experienced. But people do pay me for
pictures of their kids playing sports, so I must be doing something right. So I decided to put together this little guide
based on what I have found works best for me.
The pictures in this tutorial were shot using a Canon 7D and
a Sigma 70-200 f/2.8 lens. Not the best
equipment in the world, but in my opinion they give me the most bang for my
buck.

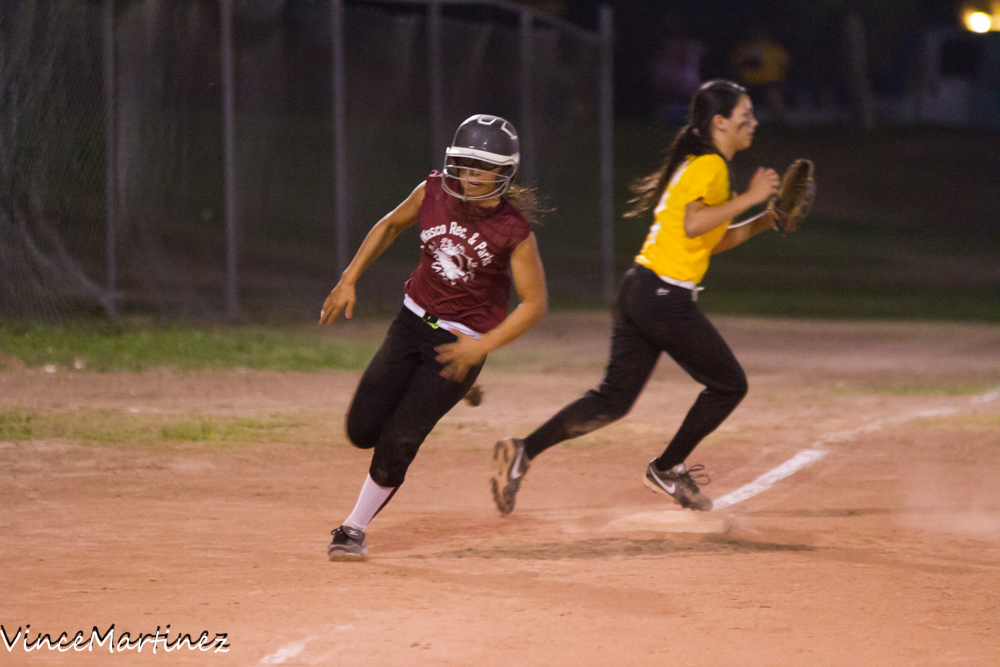
Most of the examples I am using in this guide are from a
Parkd & Rec League Softball game. It
is played at an older park with absolutely terrible lighting. The local little league field has better
lighting and the high school has much better lighting. I have shot at dozens of venues and hands down
this is the worst lighting I have ever encountered. I seriously doubt you could
find a night game played with less lighting than this game unless it was played
in the middle of a residential street at night.
The point is to show you that even in terrible lighting you can get some
quality shots. Yes, I wish they were
better, but sometimes you have to make do with what you have.
Lens Selection
So the first thing you need to shoot any sports once the sun
goes down is a fast lens. A 70-200 f/2.8
from Canon, Sigma, Tamron, Nikon or any other manufacturer is pretty much
mandatory for shooting low light sports.
If you can afford it, a 300mm or 400mm prime lens would be better, but
not many of us are going to have that kind of money to spend nor would you want
to carry something that size around.
Simply put, you need the large aperture to capture quality
images in low light. Unless you are in a
very well lite environment even an f/4 lens is going to struggle. If you have a kit lens with a variable aperture
that goes from f/3.5 to f/5.6 you simply will not have enough lite to get
quality pictures.
I personally like shooting my Sigma at f/4 because it is
sharper. I was able to shoot at f/4 for
the first half hour of this game. But
give that the game went until almost 10 pm that simply was not a reality for
very long. Once the sun went all the way
down, it was just to dark to shoot at f/4.
I needed all the light I could get, that meant f/2.8.
ISO
I have seen a lot of discussion on the internet about ISO
and nighttime sports photography. I am
not really sure why there is so much discussion. I have seen a lot of people make unrealistic
claims or some are even reluctant to say how high they set their ISO like there
is some embarrassment among photographers about using high ISO settings.
Here is the reality of shooting night games. You are going to have to bump your ISO. There is no getting around that. And the higher the ISO goes the more noise
you will see in the image. You will lose
some fine details and the colors will wash out.
Simply put there is no getting around this.
I see people in chat rooms making claims that they never
shoot higher than 1600 ISO at night games.
I think they are not being honest.
Even professional games you would struggle with that low of an ISO
setting. More realistically I see a lot
of people saying they never go above 3200 ISO.
But even that is pushing it when it comes to high school level sports or
below.
Professional stadiums are set up with a ton of lighting for
television cameras. Even then
photographers tend to have some problems.
High School lighting is terrible.
Newer schools or schools with large athletic programs tend to have
better lighting. But even well lite
stadiums do not provide you with the amount of light you really need for high
quality sports shooting.

At the softball game I went to, I had no choice but to turn
my ISO up to 6400 at times. Even at that
setting I had to have my aperture set to f/2.8.
My shutter speed was all the way down to 1/250 of a second at times. I even shot a few at 1/160 of a second for non action shots. Even then I was struggling to have enough
light.
There is no shame in having to bump you ISO up. It is just a reality unless you want dark pictures. In some venues you may not have to go up that
high, but the reality of amateur sports is you will have to. Even though it was completely dark out, the
field was not lite evenly. I was able to
shoot pictures of the batters 4000-5000 ISO because the batter’s box was well
lite. But the pitcher’s mound was dark,
so I had to bump up the ISO to 6400 for shots of third base and second
base. I did try to get pictures of the
outfields but it was way too dark and my 200mm lens even on my cropped sensor
Canon 7D just did not have the reach.
SHUTTER SPEED
As I already mentioned I had to turn my shutter speed all
the way down to 1/200 of a second.
Typically for sports you do not want to drop below 1/500 of a second. Ideally you want to be above 1/1000 of a second
for sports. This helps you to freeze
action. It also helps to eliminate any
blurring in your image from camera shake by having the shutter open for a
shorter period of time.
 At 1/250 of a second, you can see how much motion blur was
introduced into my images. The ball is a
yellow blur. The bat is blurred. The pitchers hands are blurred. Fortunately in baseball the players are
relatively static. The arms move, but
the body is pretty much in the same place when hitting and throwing. This helps to keep the faces relatively sharp. But with that slow shutter speed I also had a
lot of misses when players moved quickly.
It created motion blur and unusable shots.
At 1/250 of a second, you can see how much motion blur was
introduced into my images. The ball is a
yellow blur. The bat is blurred. The pitchers hands are blurred. Fortunately in baseball the players are
relatively static. The arms move, but
the body is pretty much in the same place when hitting and throwing. This helps to keep the faces relatively sharp. But with that slow shutter speed I also had a
lot of misses when players moved quickly.
It created motion blur and unusable shots.
Given that this was a 13-16 year Rec League Game I was able
to get away with this. But for more
serious completion like High School Varsity games or traveling teams, I would
not have been able to use this shutter speed.
They simply move to fast. The
ball travels to fast. I would have had
to bump my shutter speed up and deal with the darker images.

It also helped me that I have Optical Image Stabilization on
my Sigma lens. This helped me to keep my
images sharp. Ideally, you want your
shutter speed to at least match your focal length. On my cropped sensor Canon Camera that means
I should have been around 1/320 of a second to eliminate camera shake. But with image stabilization or if I had been
shooting on a monopod I can go lower and not worry about it.
WHITE BALANCE
White balance is something that causes new photographers
fits. Have you ever taken a picture at
night and noticed a blue or orange tint to the image? The reason for this is the lights. Different lights produce different colors on
everything they illuminate.
For example Tungsten lights typically found in homes, tend
to cast an orange tint onto images. Florescent
lights give a green tint to the images.
 I personally set the white balance to florescent lights for
this game. But the color was still not
100% accurate. The reason for this is
that the lights in many stadiums cycle.
Meaning the lights flicker as they power up and cycle back down. This occurs to fast for the human eye to
notice. But your camera will show these changes in your images. This means inconsistent exposure and
inconsistent color balance. You will
find one shot that looks perfect, then one that is terrible. Unfortunately the reality is there is no way
around this. The only thing you can do
is import the images into editing software such as Lightroom and make the necessary
adjustments after the fact. Here is a
link to a great explanation on this with sample images http://www.sportsshooter.com/message_display.html?tid=20873.
I personally set the white balance to florescent lights for
this game. But the color was still not
100% accurate. The reason for this is
that the lights in many stadiums cycle.
Meaning the lights flicker as they power up and cycle back down. This occurs to fast for the human eye to
notice. But your camera will show these changes in your images. This means inconsistent exposure and
inconsistent color balance. You will
find one shot that looks perfect, then one that is terrible. Unfortunately the reality is there is no way
around this. The only thing you can do
is import the images into editing software such as Lightroom and make the necessary
adjustments after the fact. Here is a
link to a great explanation on this with sample images http://www.sportsshooter.com/message_display.html?tid=20873.
Post Processing
It does not matter how good you are, or what kind of gear
you have, nighttime sports photography will require image editing. Getting the colors and exposure correct is
something you have to do after the fact due to the flickering lights. You will also most likely want to reduce some
of the noise in your images from shooting at a high ISO.
As I mentioned, I personally use Lightroom for my image
editing. Most professional photographers
use Lightroom for the majority of image editing. A lot of none pros think everything is done
with Photoshop. The problem is Photoshop
is slow. It is also complicated to
use. Even those who are proficient in
Photoshop only use it for advance editing that is not possible in
Lightroom. And with every new version of
Lightroom, they introduce a host of new features that were previously only available
in Photoshop. And they best part is
Lightroom is that is costs fraction of the price for Photoshop. It is very easy to learn as well. Some of the more advanced features might seem
confusing, but a simple search of YouTube and you can figure out even the most
advanced features of the program in minutes.
Just like anything, the more you practice shooting night
games the better you will get. Try
different settings on your camera and find out what works best for you. Everything is subjective in photography. For me personally I like brighter pictures
and I’ll deal with the noise and some motion blur. Others would rather limit the noise and
motion blur, but end up with dark images.
You have to find what works best for you. And that means a lot of trial and error.
No comments:
Post a Comment